![]() Phone: 605-554-1911 | Email : sales@primalrights.com
Phone: 605-554-1911 | Email : sales@primalrights.com
![]()
Precision Rifle Marksmanship - Zero Force Firing Position
Feb 14, 2014Written By - Greg Dykstra
© Copyright 2009 - Present - Primal Rights Inc
ALL RIGHTS RESERVED
No part of this website or any of its content may be reproduced, distributed, or transmitted in any form or by any means without the express prior written permission of Primal Rights, Inc
Building your firing position is one of the most important factors of successfully operating a precision rifle. Of all the fundamental concepts which govern the precision and accuracy we can achieve with our rifles, firing position generally has the least attention paid to it and is quite possibly the least understood. Often when we see someone compromising a fundamental, their position is usually the first to go. Grab a sandwich and your favorite beverage, because this is going to be a long one. So much so that I hesitated even writing it, simply because there is so much to each specific point that it seemed a disservice to reduce it all to text. We're going to give it our best shot though! In this article we will break down the core components of the prone firing position, identifying the main areas of importance and explaining why it is important. In doing so, we will introduce you to what we call the Zero Force Firing Position.
Acknowledgements:
It is very important to me that those reading this article understand that many of the techniques defined herein were not developed by Primal Rights. Some techniques have been handed down through the generations. Others were developed by instructors that are alive and teaching today. Having said that, we believe that we have some very unique things to add to the equation. At the very least, a different perspective, and I hope that this article will provoke some thought to help you reach your personal goals as a shooter.
Also realize that nothing you will read here in this article will take the place of qualified instruction. Many students have shown up at the Primal Rights classroom thinking they were basically wasting their time, as they were drug along by a friend. They "knew" how to shoot already. Well by the end of day 1, their eyes are usually glossed over just like everyone else, suffering from information overload and a moderately bruised ego. It is one thing to have the information. It is entirely another to be able to recognize when you are performing a technique correctly. The ability to read and assimilate information does not make you an instructor or even a competent imitator. If you can read this article, assimilate the information within, and imitate the techniques, it will still take you countless hours of purposeful goal-oriented practice to feel comfortable and understand exactly why this stuff works. Once that happens, you'll be ready to start explaining it to someone else. Until then, try to be selfish. Learn for you, and no one else!
We offer precision rifle courses. Get training folks. If you don't get it from us... get it somewhere!
The goal of any firing position: To use your body, your equipment, and your surroundings to provide a stable platform upon which to rest the rifle steadily in order to effectively engage a chosen target. With this goal in mind, we'll talk about some terminology and concepts which will be referenced later in this article, as well as other parts to this series of articles.
Bone Support -
The first principle I'd like to introduce you to is that of bone support. This is the method of supporting your body and the rifle in which your bone structure is doing most, if not all of the work. In the prone position, this would be accomplished when your elbows being in firm contact with the ground, supporting the weight of your upper body with little or no muscle tension. You should use bone support in any position that allows it. Any muscle input to control the height, orientation, or angle of your body will result in a position that is not sustainable for an indefinite period of time.
Natural Point of Aim (NPA) -
Natural Point of Aim, which I'll hereafter refer to as NPA, can be best described as the exact point of aim (POA) your rifle has without any input from you. So, if you lay your rifle on the ground, look through the scope without touching the rifle, and it is pointed at the upper-right corner of the target: That is its NPA. Any movement you impart on the rifle, changes its NPA. Here's a really important part, so pay close attention: Any pressure you apply to the rifle, even if it does not actually move the rifle's POA, can also change it's NPA, if that pressure is applied off-axis to the bore. When you deploy the bipod and set the butt stock on a rear bag, the NPA would be the point in which the rifle settles and ceases to move. The goal is to have the rifles NPA line up precisely with your intended target. As such, you want the crosshairs to intersect the exact point on the target that you intend to hit, without any physical input from you. This is where some people get lost. Obviously you must maneuver the rifle so that you get the crosshairs lined up. It would stand to reason then that you must keep applying pressure to something so that the crosshairs remain lined up, wouldn't it? Yes, and no. If your position demands that you must exert muscle force to keep the crosshair lined up, then my suggestion would be to modify your position. If you set the rifle on its bipod, and put a 2" piece of wood under the buttstock, the POA will be lower downrange , as you've elevated the rear of the rifle and left the front the same and thus changed the NPA. If you then put a 4" piece of wood under the buttstock, you have effectively lowered the POA again, and again changed the NPA. We'll get into the specifics of how to achieve NPA later in this article, but just understand that NPA represents the rifles exact point of aim without any muscle input from the shooter. Where the rifle is pointed when it is at rest, is the rifles NPA.
Muscle Fatigue -
A goal for every shooting position is to use the smallest amount of energy possible. One sure way to reach that goal is to avoid having to use your muscles to support you, your gear, or the rifle. This is most easily accomplished in the prone position, but can be done effectively in other positions as well using bone support and any available support your environment provides. If you are using muscle power, you will not be able to maintain your position for long periods of time, whether engaged in firing or not. Eventually, whatever muscles you are using, will begin to fatigue. When this happens, your body will have a natural tendency to elevate its operation to feed those failing muscles. This will result in elevated heart rate, shortened breathing cycle, and inevitably, muscle tremors. All of these things are bad and will cause your reticle to jump around the target, making a solid sight alignment impossible. That being said, the mental aspect of fatigued muscles blows more shots than the actual muscle fatigue itself. People don't like pain, so when they feel their muscles start to fail and tremor, they will fight against it, which only makes it worse. When they are thinking about their shaky muscles and watching the reticle bounce around the target, they aren't thinking about the fundamentals of marksmanship. Instead of fighting against their muscles, they should be accepting their feedback in order to correctly modify their position to relieve the source of muscle strain. We will address muscle strain and how to reduce its effects while instructing you on the finer points of the Zero Force Firing Position later in this article.
Recoil -
Newton's Third Law: For every action, there is an equal and opposite reaction. This is a fact of physics which defines our daily lives. As it applies to shooting sports, this simply means that when we press the trigger on our rifle, the force of the bullet being launched down the barrel is met with an equal amount of force being applied to the rear of the rifle and inevitably transferred to the shooter. This simple fact could be the basis of an entire article itself. For our purposes here, I will simply tell you that we must control the rifle through the entire recoil impulse. If the crosshairs never leave the target during the recoil impulse, we have done one of our jobs as a shooter. If the recoil force causes the crosshairs to leave the target at any point during the recoil impulse, then it is also very likely that the shot may not land where we intend it to land. Suffice it to say that we want the recoil to be managed straight back, so that the reticle does not leave the target at any time during the recoil impulse. That is our goal, and that should be our expectation for every shot fired.
Preface: Before we get down the the technique itself, please understand that the context of this article is under the motto of "perfect practice" in a controlled environment. The order in which these steps are presented is designed to address each aspect of this position individually. As such, following these steps verbatim in a tactical rifle competition will be very counter-productive for you. We are trying to build a foundation here, and as a result, the pace must be very slow and deliberate, with ample attention paid to each detail. You've all heard the weight-lifting expression that a repetition done with improper form is a wasted repetition. Well that holds very true for this discipline as well. Thus, when digesting this article I would like you to remember that identifying and performing each technique slowly and deliberately has infinitely more value than slamming through the movement quickly. Each human being is slightly different than the others. As a result, the way I do things here in this article may not work for you. You may have a permanent injury, or a different body type that will make the movements suggested impossible. If that is the case you can always email or contact me and I would be happy to suggest alternate techniques which may suit you better. However, I would like you to at least give this method a serious effort.
In the spirit of giving this a serious effort, I completely understand that the suggested techniques might feel completely awkward at first. You may be very uncomfortable and might even need a friend to manipulate your body for you to achieve the desired results. This is very normal when starting out. Your body is used to doing certain things and moving a certain way. Depending on your lifestyle, it may resist these new techniques. It is your job to overcome these limitations mentally. Thus far I have introduced these techniques to well over 100 different students in the last 2 years. Those students came from all imaginable walks of life, with some being very experienced shooters, and others being completely new to the sport. To date, no one has said that the instruction has not helped them in some way. So I ask that you push through the uncomfortable parts, knowing that improvement in your abilities as a shooter is a very real likelihood. At the very least, it may provoke other ideas that may help you in other areas of your chosen discipline. Also, a word on firing positions. Prone, sitting, kneeling, and standing are the more familiar, but there are an infinite number of compromised firing positions which can have real value in competition, hunting, or tactical situations. There are books over an inch thick dedicated to the topic of positions, so for the scope of this article we will focus on the prone firing position. It is very important to remember, however, that the fundamentals outlined within this article can and should be applied to all firing positions in the greatest degree possible. Lets get started!
Step #1 - Choosing a Firing Position.
a. Location
Deciding where to lay down can have a very real effect on the accuracy and precision of our rifle. This consideration applies to things affecting the shooter just as much as things affecting the rifle itself. Lets address the shooter's aspect first. An uncomfortable shooter will tend to perform more poorly than a comfortable shooter. This is a steadfast fact that I have observed while working with various students. The mental aspect of shooting is extremely important, and we will address it in a different part of this series. If there is a rock digging into the shooter's sternum, then it can affect them mentally, taking their focus off the task at hand. Also, if the position is not flat, the force of gravity can affect the stability of the firing position. Gravity will pull you straight down toward the planet, but if you are laying on the side of a hill, it will affect your body and position differently than if you are on flat ground. If you are arched up in the middle of your body, then you may not be able to comfortably get straight back behind the rifle. With these things in mind, you want to choose a firing position that is as flat as possible, which allows you to clearly see the target. Obviously our planet isn't always completely flat. Especially across a 6ftx3ft patch of earth that we might be laying on. To achieve the perfect practice that we want, make yourself as comfortable as possible. Get any large rocks, sticks, or debris moved from the area you intend to lay. Use a padded shooting mat which will absorb the impact of any jagged rocks or sharp grass and maintain its position under a stiff wind. A thick rubberized exercise mat works quite well here. Make sure it is wide enough to support your elbows at their widest point, and make sure that at least the top 3/4 of your body can fit on it. If it's comfortable enough to fall asleep on, you're in business. Oh, and make sure you can actually see your target while laying down. Having a comfortable firing position in which your bullet will have to travel through 20yds of tall grass is not going to end well for you.
b. Harmonic Vibration
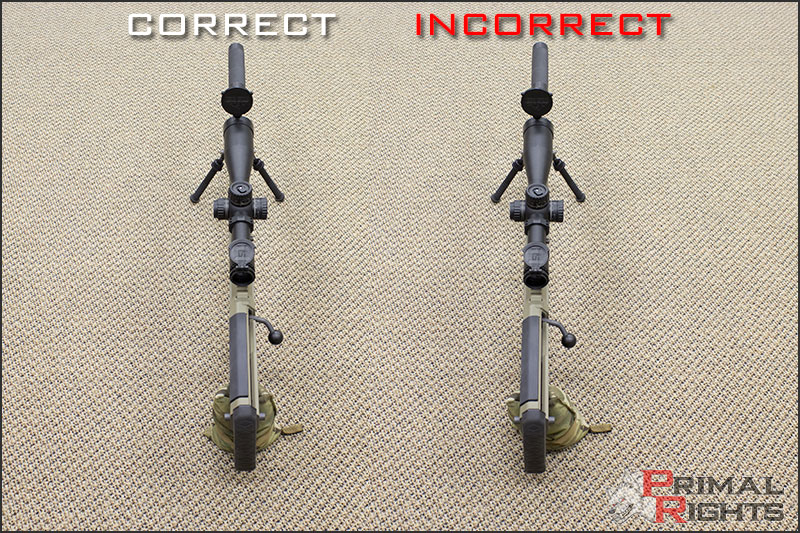
The second aspect of choosing a firing position relates to the rifle itself. I'm sure most of you have heard the term "harmonic vibration." When fired, these rifles vibrate as a result of the expansion of powder, the bullet striking the lands, and the subsequent pressure wave riding down the barrel behind the bullet. That issue is far more complex than that, but for our purposes here it will suffice. Think of how a tuning fork behaves when struck and then pressed against a hard object such as a granite counter top. The result is fairly violent and the vibrations are felt vividly in the handle. Conversely when the fork is struck and pressed against something soft such as a rubber tire, the vibrations are attenuated and quite subdued. This is a function of how solids interact with each other in the physical world. One of our goals is to have the rifle vibrate the same way each time we fire it. In order to do this, we must ensure the contact points between the rifle and the planet are the same between our first round and each subsequent round fired. This leads us to address how our rifle sits on the planet. We do not want "hard" contact with the planet anywhere on the rifle. In this instance that means we do not want the bipod and rear support to be rigid. This is one of the primary reasons that we are a staunch advocate of the Atlas bipod by B&T industries.The Atlas is a very forgiving bipod due to the pliable rubber feet which are considerably softer than competing bipods. This results in a very forgiving interface with the planet which will deaden vibration rather than react violently with it. Some shoot off a ruck, others use a bipod and rear bag, while others use a bipod and monopod. There are limitless combinations of bipods, tripods, monopods, rucks and bags, but for our purposes we will discuss the bipod and rear bag/monopod method. In this setup there are three points of contact with the planet. The two bipod feet up front and the rear bag or monopod in the rear. This setup basically forms a tripod. Keep the bipod feet perpendicular to the rifle's bore to ensure the weight of the rifle is evenly distributed across the three points of contact. If one of the bipod feet is in front of the other, then the rifle will have a tendency to tip toward the side of the forward foot.
c. Friction Differential
You do not want one of your bipod feet up on a rock, while the other is buried in the dirt. Obviously a rock is much harder than dirt, and will affect the vibration transferred into the rifle. Above we discussed the importance of having the bipod feet equidistant from the rear support point, but that fact does not fully consider the effects of recoil. Under recoil, the rifle will move rearward and if the bipod feet are not resting on a similar media, one will resist movement more than the other. This will result in torque being transferred to the rifle. Here we define another reason why the Atlas bipod is so very forgiving. On the Atlas, the torque is dissolved in the panning function of the bipod before being transferred to the rifle. However, it is important to eliminate this when possible because even though the Atlas can help reduce it's effects, when the two bipod feet go out of perpendicular alignment to the bore of the rifle, it will most often cause the reticle to move from the target during the recoil impulse. Left uncorrected this will still create torque for any followup shots. If you have a choice of where to put your bipod feet, and those choices are in the dirt, or on concrete; choose the dirt. It is softer and will eat up vibration much more efficiently than the concrete. It will also allow you more forgiveness when loading the bipod. The rule is, choose the softest media possible when placing your bipod on the planet. Obviously each firing position will be different, and may not always allow for the best choice. Also, I'm not suggesting you put your bipod in a plate of jello if it happens to be near your firing position. This is where having a forgiving and adaptable bipod will serve you very well. Your bipod accounts for 2/3 of your rifles interface with the planet. Don't go cheap here. You'll thank me later.
Step #2 - Set the Rifle's NPA.
We established earlier that NPA is defined by where the rifle is pointing when it is at rest. Obviously we can't just lay our rifle down and accept that it's NPA is correct. We must use our telescopic sighting system which is aligned to our bore, to align the rifle with the target. Start by getting a rough NPA target alignment. Simply lay the rifle on the ground and horizontally align the rifle bore with the target. Ensure you do not violate any of the principles outlined in step number one above. Next, place the rear bag under the rear of the rifle and attempt to horizontally align the bore with the target. This can be done while kneeling next to the rifle, or using a modified prone position. You want to be sure that you are not making contact with the rifle with your body, and that you are simply manipulating its position with your hands. Your bipod is for making coarse elevation adjustments while your rear bag is for making fine elevation adjustments. This means if your reticle is beneath your intended target an appreciable distance, you will need to extend your bipod legs in order to allow a fine adjustment with the rear bag. Once the bipod elevation is set, address the rear bag for fine vertical and horizontal adjustments.

When setting up the rear bag, you must choose a bag configuration which lends itself to the firing position you've chosen. The height of the rear of the rifle will determine your crosshairs position on the target in relation to the height of your bipod. This is a delicate balance. You want to ensure that the rear of the rifle is not so low that you cannot approach the rifle with your shoulder pocket. So if you are on a steep up-angle shot, you may have to find some secondary support to use beneath the bipod to achieve your desired height. For rear support we prefer the TAB Gear rear bag, as it can be used on three different sides to achieve your desired height. Here is a full review we did on the TAB Rear Bag several years ago. The rear bag's job is to support the rifle on target and provide a channel for the rear of the rifle to ride in during the recoil impulse. Think of it as a mold-able V-block. You want the bag to have equidistant pressure on both sides, and be perpendicular to the rifle stock. If the bag is leaning to one side or the other, then that is the direction it will want to fall during the recoil impulse. Get the rear bag positioned as close as you possibly can while looking through the rifle scope. You want the crosshairs to be on target, or as close as possible without you having any contact with the rifle. If the rifle moves when you let go of it, then you know that the NPA is weak in the direction it is moving. This can be caused by bipod legs which are not perpendicular to the bore, or a rear bag that is slouching to one side or the other. Identify the weakness, and correct it to the greatest degree possible. The rear bag is meant to not only provide vertical support, but give the stock a "channel" to ride in. You want the channel to be equidistant from the edges of the bag, and running parallel to the bore. Obviously rear bags are meant to be manipulated by varying the amount of pressure applied to them to raise and lower the rifle. The closer you can get the crosshairs to the target without any rear bag manipulation at all, the stronger your rifles NPA will be. To check the strength of your rifle's NPA, you can simply bump the rifle straight forward and rearward to observe the effects of simulated recoil. If the rifle begins to fall left or right, then you will have identified a weakness in it's position. If it simply rocks back and forth in a straight line, you will know that the NPA is strong and you can continue. Leave the rifle in the forward-most position so that as much slack is out of the system as possible.
Once you have established your rifle's NPA, consider it sacred. If that position is disturbed for any reason, you will have no choice but to rebuild the rifle's NPA from scratch. Thus, the area around your rifle after NPA has been set is holy ground. Treat it with respect and demand that others do likewise. As I said in the beginning of this article, these steps are critical for "perfect practice." You must understand that the rifle will always do the same thing, if all forces presented against it are the same, from shot to shot. So without our interaction with the rifle, it would likely launch bullets through the same hole over and over again, provided that it had some mechanism to return itself to battery after each shot. Natural Point of Aim is one of the most critical considerations which can be given to your rifle's condition before the trigger is actuated. Later, we will discuss shooter NPA, and how it affects the rifle's NPA during the recoil impulse.
Intermission:
Here we are several pages deep into this article, and we are just now going to start talking about attaching a human being to the rifle. As we go forward, remember that at no point are you allowed to violate any of the fundamentals we have established thus far. Being uncomfortable, feeling awkward, or being lazy are not acceptable excuses for ignoring any of the rules we've laid out. Remain calm, breathe normally, try to relax your mind and your body.
Step #3 - Plan Your Approach.
Having established above that your rifle's NPA is sacred, you don't just go jumping on your rifle like a teenager getting ready for his first roll in the hay with a girl. Respect must be paid and there are some rules to this courtship between you and your rifle that must be followed before you make first contact.
a. How tall are you?
When initially laying down behind the rifle, you want to ensure that you will not bump into it. Step straight behind the rifle and address just how far it is between your feet and the top of your shoulders. There are some tricks to determining just how far you should stand behind the rifle before getting down on it, and practice will give you the experience you need to build confidence in your technique here. One way is to stand behind the rifle and extend your arm toward the rifle at about a 45 degree angle. With your arm at a 45, walk to where your finger lines up with the rear of your rifle. Another method is to extend your thumb and pinkie finger as wide as they will go, place one finger against your stomach, and stack your other finger/thumb on top of it. Three of those, and that will show you the approximate position you should be in. Another method is to stand directly behind your rifle and take two large steps rearward. The goal here is to be able to lay down behind the rifle so that your firing shoulder pocket is about 3-5" away from the recoil pad. With enough practice, you'll know the correct distance just by looking at it. You won't have to measure anything. This is just to get your distance and approximately where to stand. We'll cover exactly how to get down on the rifle in subsequent steps.
b. Line up your shoulder pocket.
You know the rifle needs to contact your body on your firing shoulder pocket, so you cannot stand directly behind the rifle's bore, or you would be indexing the recoil pad on your face. The human head is located atop the center of our body, so the recoil pad needs to go to one side or the other depending on your eye dominance. If you are right eyed dominant, you should index the recoil pad in the pocket between your neck and your right shoulder. The exact point of contact will be different for everyone, based on your body type.
c. Line up your feet.
Taking into consideration items A and B above, align your feet so that if you were to draw a line between the toes of your boots, that line would be perpendicular to the rifle's bore. You do not want to be bladed off to one side. Feet should be approximately shoulder width apart, standing naturally, and be completely perpendicular to the bore.
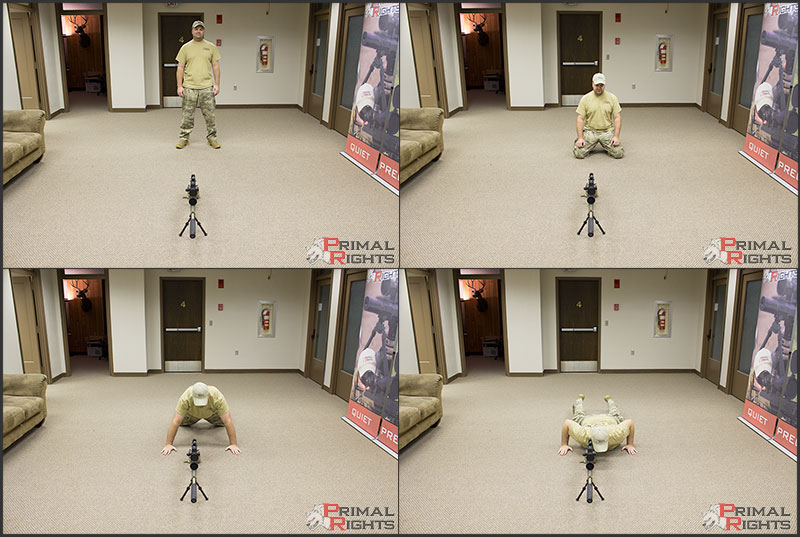
d. Kneel.
This part is fairly straight forward. You keep your toes in the position they started in, and roll forward onto your toes as you kneel down, preferably landing on both knees simultaneously. Some people will be physically unable to accomplish this, so you can compromise by rolling one knee forward and then the other. Try placing your hands on your thighs for leverage as you go down, to help you get there easily and in a controlled fashion. Some students feel the need to launch themselves into their rifles as they lose balance while attempting this. Don't be that guy. The key here is that you keep your toes in contact with the ground, and when your knees contact the ground, they too will be perpendicular to the rifle's bore and equidistant from each other as related to your feet. So, if your feet and your knees are both perpendicular to the rifle bore, move to the next step. If not, get up and do it again until they are.
e. Lay Down.
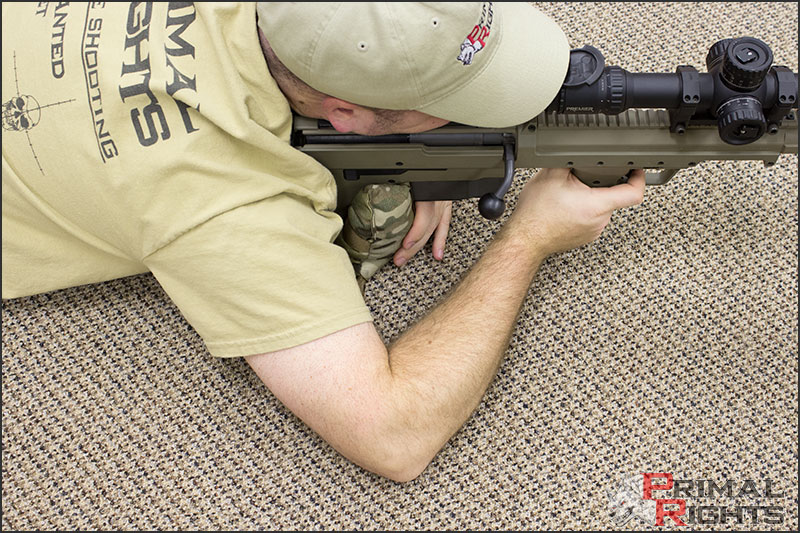
This part here is a bit more complex. Us humans are very bendy at our waist. We articulate better than virtually any machine can here at this juncture, and it can be very difficult to consciously control the angle of our spine as it relates to the position of our hips. Our goal is to get in straight behind the rifle, as such that our spine is parallel to the rifle's bore, while the lines between our elbows, shoulders, hips, knees, and feet are perpendicular to the rifle's bore. Extend your torso toward the rifle, using your hands to support your body until your chest comes in contact with the ground. Take all weight off your hands and elbows, and lay your feet on the ground with your toes pointed outward. Be very cautious to not change the angle of your knees or feet in any way. All major joint pairs must stay perpendicular to the rifle's bore.
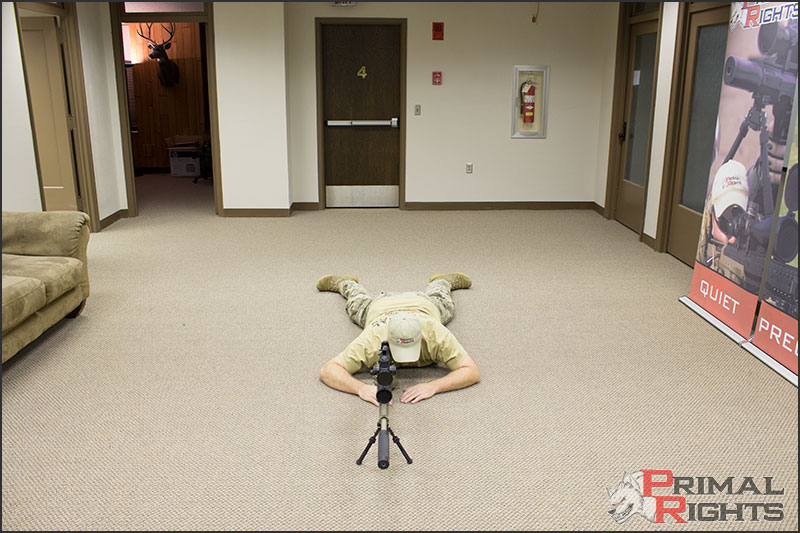
This step will likely take the most practice, and will benefit greatly from the trained eye of a friend, camera, or mirror. It is very difficult to tell for yourself whether your spine is parallel to the rifle bore or not. However, a trained observer looking down at you from above can usually detect any misalignment relatively easily. If training alone, a full body mirror at the right angle will give you a fairly good view of what's going on. Do not cheat here, and do not get lazy. Practice perfectly and make every rep count. If you fail to get in a proper position, stand up completely, and start over from step A above. The more you do this, the more comfortable you will start to feel. You want to push through and discomfort, and pay attention to what the "right" way feels like, so you can recognize it when your body is in the correct position. This will take many repetitions to get right. Cheating here will hurt you later on. At this point, what we call Shooter's NPA has been achieved. You should be able to lay flat on the floor, with no muscle force applied, and be pointed in the same direction as your rifle.
f. Close the Distance.
If you have performed all of the above steps correctly, your firing shoulder pocket should be 3-5" away from the recoil pad, and all major joint pairs should be perpendicular to the rifle's bore and equidistant from each other, while your spine remains parallel to the bore. Now we need to move into the rifle without violating the rifle's NPA, or your NPA. You do this by bending your ankles to point your toes forward, dig your toes into the ground while using your hands as if to begin doing a push-up. You do not need to lift your body far off the ground. You simply use your toes to nudge your way forward. Lock all of your other major joint pairs in place. You must move your entire body as a complete unit. You do not want to bend your hips, waist, or take any part of your body out of perpendicular alignment with your rifle's bore. If any of those joint pairs come out of alignment, then your spine will no longer be parallel to the bore, and you must start over. Once in this position, it is very difficult to fine-tune shooter's NPA without the help of a competent instructor. It is better to simply rebuild the position from scratch. More is gained from these forced repetitions than is gained from being lazy and only making fine adjustments. It will train your body to behave correctly and identify the right way from the wrong way.
Step #4 - Joint NPA
Making contact with the rifle is a critical aspect in the entire process. To this point, we have taken great care to develop the rifle's and the shooters NPA. When the two meet, we call that Joint NPA. It is at this moment that the rifle and the shooter become one single unit, and must be treated as such from that point forward. A mistake here can shatter the entire system, requiring you to basically rebuild from the very beginning of this article. Just remember to relax, and make decisive controlled movements. There is no time limit on these techniques. Take as long as is necessary to allow your mind and body to fully appreciate what the correct repetitions feel like.
a. Deflate Your Air Bladder's
Just before making contact with the recoil pad on your rifle, ensure all of the air is out of your lungs. The reason for this will be discussed in a subsequent article of this series when we discuss breathing technique. Your breath condition should be relaxed, at your natural respiratory pause before you would begin drawing another breath. Time the contact of your shoulder pocket with the recoil pad when you are in this natural respiratory pause. Do not prolong it or ambush it, just relax and let it happen.
b. Do Not Violate Joint NPA
All above rules must be followed. If you bump into the rifle too hard and violate it's NPA, rebuild its position from step one. If you violate your NPA, stand up and rebuild it from scratch. It's important to get used to the fact that any input to the rifle which is not intended, is similar to a car wreck. Things must be rebuilt before you can get on the road again. Control yourself deliberately, and control the rifle deliberately, and it will eliminate accidental destruction of NPA. Remember, perfect practice. Once you have mastered these fundamentals, then you will be qualified to fine tune slight mistakes from the firing position without having to totally reset. We're trying to learn here, and train our bodies to perform the techniques correctly. So as a matter of course, repetition is a good thing, and any excuse to build a good rep, is a good excuse.
c. Load the Bipod
Body pressure should be applied by laying your dead weight behind the rifle. Do not shove or push on the recoil pad using muscle force. Simply lay the weight of your relaxed body up against the recoil pad. You should feel slight pressure against your shoulder pocket from the rifle's resistance. This will take the slack out of the entire system. Do not bulldoze with the bipod. It's designed to support the rifle, not dig in the dirt like a bulldozer. If the bipod is pushed forward, you are applying too much weight, and very likely have violated Joint NPA. Finish this movement by placing your hands flat on the ground beneath the rifle, to ensure your elbows are equidistant and perpendicular to the rifle's bore.
Step #5 - Zero Force Measurement
If we have maintained all of the above fundamentals to this point, then we have built one fantastic prone firing position! If the trigger were actuated, we are virtually assured to receive the recoil straight to the rear and maintain sight picture through the entire recoil impulse, right? Possibly. Yet we can still take this further. I will warn you, this next aspect of our technique is very different than what most have been exposed to. I would ask that you keep an open mind while reading.
The human body is a fascinating machine. We can sense pressure, weight, temperature, and all manner of other variables. This is what makes us so good at utilizing all of the various tools that put us at the top of the food chain. That ability to measure finite variables can either help us, or hurt us. Regardless of how well tuned the human body and mind can be, there comes a point where we simply lose the resolution required to measure things. If someone sets a 5lb weight on your finger, you are going to feel it without question. If someone sets a tiny tuft of goose down on your finger, you may not realize it's there at all. Each person is different, but at some point, our sensors simply lack the resolution to determine how much force is present. Through conscious effort, and repetition, our bodies can become tuned to force measurement for a specific motion or task. Take driving your vehicle for example. You instinctively know that applying "X" amount of force to the gas pedal will result in you traveling at 65mph. Even if we took away your speedometer, your experience in that vehicle could get you fairly close to your desired speed. If we blacked out your windows so you could not see, your hearing would take over and you could still probably be fairly close to your desired speed. The more "sensors" we take away, the larger your window for error becomes. Regardless of the situation, your body is programmed to use all of it's available senses to perform it's assigned tasks.
The key information to draw from this is that we all have a different resolution to our senses, depending upon our unique lifestyles. More importantly, our senses are an automatic function of our body, which is tied directly into our subconscious mind. The subconscious mind is where our instinctive traits and faculties lie. A fact which is overlooked by most shooters is that our instinctive abilities far outweigh the performance of our conscious abilities. Thus it tracks then, that the more physical and mental operations we can turn over to our unconscious instinctive faculties, the faster those operations will be carried out by our brains. The more we turn over, the greater the payload and capacity of our conscious focus. Repetition, being the only known mechanism for turning physical and mental acts to your instinctive faculties. Now I realize this is getting fairly deep here, but these concepts have been proven beyond a reasonable doubt to those that have spent the time working with them. This is a very complex issue, which is deserving of it's own article on our instinctive capabilities as it relates to shooting, at a later date.
Lets get back to our resolution as it pertains to sensing force. If we know that at some point we all lose resolution, and the ability to determine force is largely situational, then why would we want to rely on our conscious senses to take force measurements at all, and why does any of this matter as it relates to operating a precision rifle? Think for a moment what we've done to this point. We've aligned our body with the rifle, and eliminated angles so that when recoil force is present, our body reacts in a predictable way for the first shot, and each subsequent shot. Now imagine how that recoil force would be distributed through our body if our firing shoulder was tense and tight, while our non-firing shoulder was loose and flaccid. Rifle recoil behaves similar to electricity in that it will flow to the path of least resistance. In the above example, we are virtually assured to have the rifle's muzzle move in the direction of the loose shoulder during the recoil impulse. Given that fact, we know that the goal should be to have equal tension on both sides of our body. There are a couple ways to achieve this. One is to simply take a force measurement of how much muscle tension we have in each of our muscles throughout our body, and ensure they are equal on both sides. However, knowing that our resolution for measuring force is situational, this may not work well. Also, we cannot keep force in our muscles indefinitely. The more muscle force that is applied, the sooner we fatigue. If we are physically fatigued, our ability to perform minute tasks is diminished, our heart rate is elevated, and our breathing cycle is shorter. These are all very bad things when trying to operate a precision rifle. So what is our other option?
Take no force measurement at all. If we are taking a "zero" measurement, then we require no real resolution to take a reading. Our sensors are bottomed out at zero, and at that point our subconscious brain gives our conscious brain permission to completely ignore that aspect of our body. It is in this state that a shooter can achieve a higher level of focus and clarity than they may have thought originally possible. If it sounds "zen-like," well that's because it is. The golden rule here is that the farther away from the rifle you can keep your tension, the less affect that tension will have on the shot. It is far easier talking about achieving this state, than actually achieving this state. However, with practice, it becomes easier. Manipulating things in the physical world requires physical effort and thus force. So once we are in this firing position, we need to focus on removing the force measurements from our bodies. Start in your fingertips, which should still be laid flat on the ground beneath your rifle. Work back toward your toes, trying to completely relax each muscle. Lay your head on the ground next to your rifle, and just try to completely relax. It seems as though no one technique works for everyone, however, with a little effort you should be able to find something that works for you. Do research on relaxation and meditation techniques. They will help you control the mental aspects, which will in turn help you control the physical aspects of your body. The closer you get to a truly relaxed zero force measurement, the more consistent of a shooter you will become.
The next obvious point that all intelligent people are led to is; how are we suppose to manipulate the rifle without applying any force!?!?! Exactly. We're faced with a problem here. In order for the rifle to do anything, we need to manipulate it, and that will take a couple force measurements. Really, all we need to do at first is to press the trigger. There will be entirely separate articles relating to those specific actions, but for now I will simply say that if we cannot have zero force, then we must be proficient at having equal force in those areas, and the force being applied must not be off-axis in any way. If you are pressing left, right, up, or down in any way, that pressure will effect how the rifle recoils. This is called "muscling" the rifle, and is a bad thing. Our job is to position the rifle, and then only interact with it as much as is required to press the trigger and return it to battery. The act of aligning the reticle with the target is a "setting" rather than a constant action. That setting can last a long time, or just a few seconds while we break a shot and move to the next target. When we acquire the new target, we do not want to impart muscle force on the rifle, but rather set the rifle's NPA in the new position, and then actuate the trigger.
Step #6 - Equipment Considerations
During the course of this article you've undoubtedly been performing various exercises to various degrees. Some of you may have noticed that when you do exactly as instructed here, your eye relief is no longer correct and your cheek weld may have moved. These effects may be very severe, or hardly noticeable. This is due to everyone likely having a slightly different method of indexing the rifle than what was described in the Zero Force Firing Position. Your body angles may have changed, and thus, the distance between certain points on the rifle and your body are now different.
a. Length of Pull
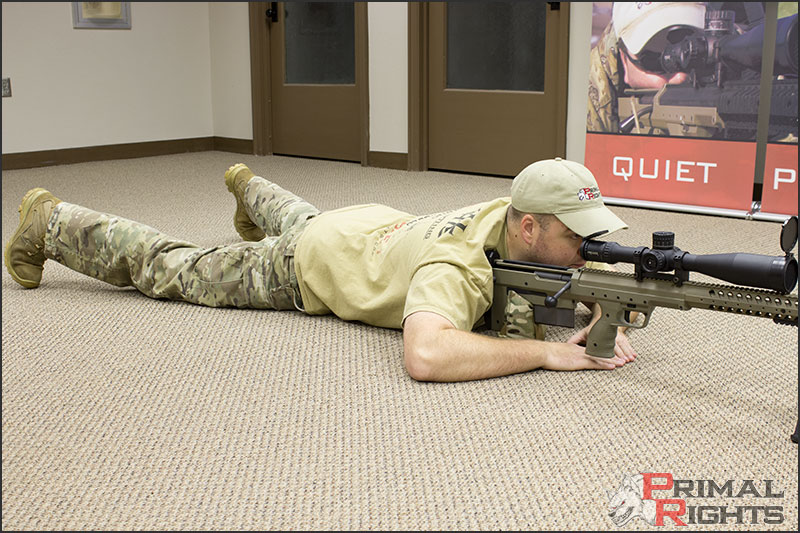
The first order of business is to address the length of pull on your stock. If you do not have an adjustable spacer system or recoil pad, then you may have to go with a stock pack or send your stock to a custom smith to get upgraded. In order to determine your correct length of pull, proper understanding of how to grip the rifle is needed. Reference this earlier article on that subject here. When proper grip is achieved, your firing arm should be bent at roughly a 90 degree angle at the elbow. Be certain of grip position and trigger finger placement. If you rotate your hand forward, you will reach farther and it will have the effect of "shortening" your perceived correct length of pull. Avoid this. The grip must be correct in order for you to properly determine whether you need a longer or shorter length of pull.
b. Cheek Weld and Eye Relief
Cheek weld and eye relief are closely tied together, but eye relief cannot be determined until proper length of pull and cheek weld has been achieved. Once proper length of pull has been achieved, you simply lay your face on the stock at your head's most comfortable and natural position. Do not stretch or scrunch your neck. It must be stress-free and natural. Do this a few times, and completely ignore your scope until you are sure you have a natural position with no tension in your neck. If your eye relief is correct, move on. However, if your eye relief is not correct, then move your optic according to your new stress-free position. The full weight of your head, should be supported by your rifle. The force measurement on your neck should be zero, or as close to it as you can get!
We'll stop there.
Believe me when I tell you that this article is fairly trimmed down. Each of the above topics can be taken much farther than we've gone. Notice, we haven't even fired a shot yet. There are far more considerations to operating a precision rifle properly that go far beyond firing position. You can't build a house without a foundation, and you can't expect precise and accurate shots from a rifle without a solid firing position. We've just demonstrated one position, from thousands of possible positions. The fundamentals do not change as positions change. You take them with you, and depending upon the position, you may have to compromise somewhere in order to be effective.
I hope this article has been of some value to you. Whether you enjoyed it, or hated it, I'd love to hear your comments. Stay tuned for our future articles on Precision Rifle Marksmanship that cover breathing techniques, trigger manipulation, neurokinetics, and more!
Older Articles:
Most Recent Posts
Primal Rights, Inc
18570 Chance Rd
Meadow SD 57644
© Copyright 2009-present Primal Rights Inc
ALL RIGHTS RESERVED
No part of this website or any of its content may be reproduced, distributed, or transmitted in any form or by any means without the express prior written permission of Primal Rights, Inc